


How to DIY a Triangle Wedding Arch for the Fall
One of the most beautiful, memorable, and important decor pieces of your big day will be the wedding arch. In front of the arch, your friends and family will watch you say 'I do,' and your photographer will immortalize these special moments forever. The arch should reflect the theme of your ceremony and your personality. Luckily, creating your DIY triangle wedding arch is easy and inexpensive with our realistic flowers and easy-to-follow instructions.
In this tutorial, you'll learn how to DIY a beautiful fall-focused arch, how to decorate a triangular arch for a wedding, and all of our tips and tricks to make the process easier. Although we've created a DIY rustic wedding arch perfect for fall, you can adjust for any color palette or theme. Read on to learn how to DIY, or watch our step-by-step video for visual instructions.
Supply List: What you'll need to DIY a Triangle Wedding Arch
- 4 Designer Flower Boxes in Burnt Orange and Navy 1 Supporting Flower Boxes in Provence
- 2 Boxes of Accent Flowers in Russet Orange and Denim Blue
- 2 Blocks of Floral Foam
- 2 Pieces of Wood
- Green Hollow Rods Cable Ties
- Hot Glue Gun
- Crafting Shears or Scissors
- Your Creative Spirit
We chose Burnt Orange and Navy Grand flowers for our romantic autumn wedding arch. The different blooms and the mix of warm and cool tones in the Russet Orange and Denim Blue collection create a rich and dynamic look.
However, you can use any color collection that catches your eye. Our Burnt Orange and Scarlet, Rust and Sepia, or Sunset Terracotta are also popular for fall weddings. Whatever your color choices, we recommend having about 4 boxes of primary flowers with 7 boxes of supporting flowers, but you can use more to give your arch a more lush look.
How to DIY a Triangle Wedding Arch
Step 1. Getting started cutting the cable ties
Use the cable ties to secure the two pieces of floral foam to the opposite corners of the triangular wooden arch. The spacing helps to make the overall look harmonious and balanced. Make sure to trim any access cable ties.

Step 2. Sort out the materials from the flower boxes
Remove the materials in the flower boxes and sort them by color and variety. Next, cut the stems of your leaves to your desired lengths and sort the flowers by color. This step is important because rearranging the pieces by color and type will save you time later. Remember that grouping flowers of the same kind will make the entire arrangement appear more full.
Step 3. Building the base for the floral arrangements
First, use the smaller, denser, darker leaves to form the overall shape of the arrangement. Start at the center of each foam piece and fan out. Once you've done that, add lighter leaves to make the base look more layered. Finally, add in the leaves with high color saturation.

Repeat the same steps on the opposite side of the arch. This will help create an asymmetrical yet balanced design.
Step 4. Going blue: Inserting the blue leaves
Insert some of the blue leaves into any areas where the floral foam is exposed. The contrasting colors add depth, so make sure to spread the blue foliage evenly throughout the orange. Once again, repeat on the arch’s opposite side.

Step 5. Attaching the plastic rods to the flower stems
In this step, you'll attach the green plastic rods to the flower stems. The rods serve a few purposes: they protect the wire stems, elongate them, and add durability.
Cut the green hollow plastic rods to the same length as the flower stems. Insert the stem into the plastic rod and seal it with hot glue. Let the glue half dry before inserting the rod so it sticks more firmly. Look for any gaps and fill them with flowers- this is also a good philosophy for life!
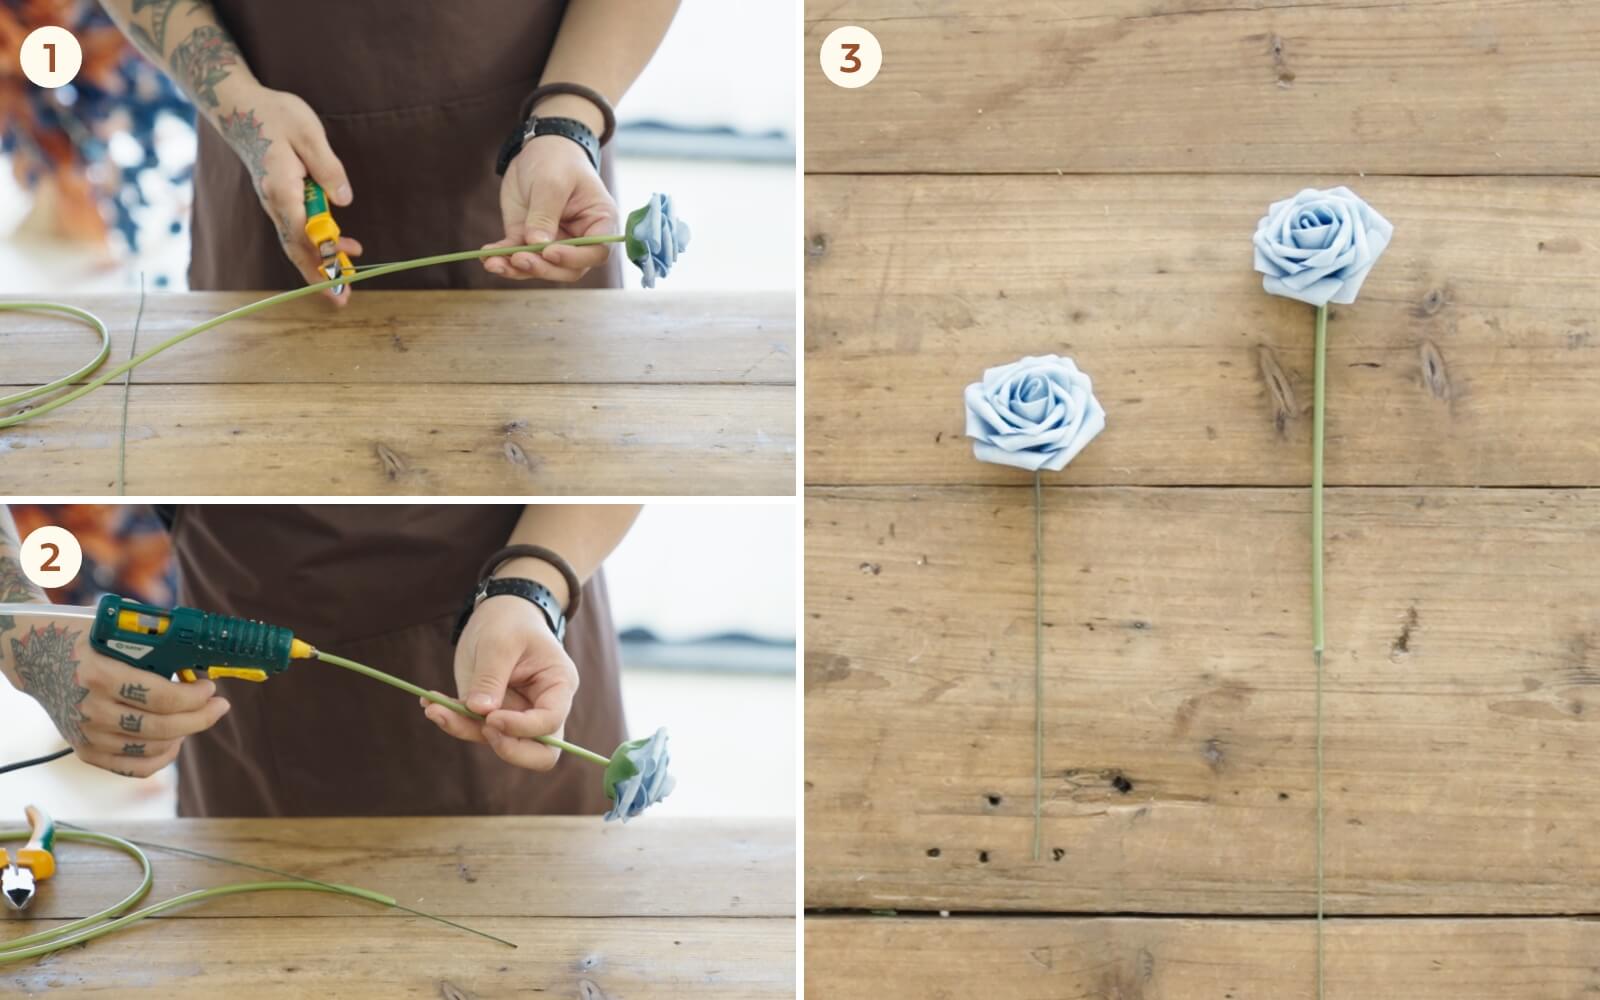
Tip: If you want a more vivacious look to the floral pieces, consider cutting a few decorative flowers longer than the branches to increase the reach of your arrangement.
Step 6 Final touches: add the last flowers
Add the primary flowers and light-colored, spherical flowers for embellishment. Look again for gaps or exposed foam and fill with flowers or leaves. Make sure your contrasting colors are evenly dispersed throughout the arrangement.

And just like that, you have DIY'd your very own triangular wedding arch! Ready to take your masterpiece a step further? Keep reading for more triangle arch styling tips.

What does it mean to have a triangle wedding arch?
A triangle is a shape where both sides meet at a common point, leaning on each other for strength and support. In this shape, each side supports the other, creating a resilient structure that can bear weight incredibly well, which makes it an excellent choice for heavy structures like bridges.

In the Christian bible, God is represented as a triangle, also known as the Holy Trinity. Triangles are also found all over the natural world: grass, rocks, animal ears, leaves, and flower petals all display triangles. Hindu culture has multiple holy Trinities, but the most well-known is Brahma, the Creator, Vishnu, the Preserver, and Shiva as Judge.
All of those qualities are represented in a triangular wedding arch: working together to achieve mutual goals, the simple beauty of a single flower petal, support, strength, and resilience.
How tall should a triangle wedding arch be?
For most ceremonies, 7-8 feet is the ideal height for the wedding arch. This range allows the arch to serve its purpose without overwhelming the space or obstructing the photographer. Always confirm the ceiling height and dimensions of your wedding venue or space and make appropriate adjustments before embarking on your DIY journey.
How to decorate a wedding arch
Decorating your triangular wedding arch is a fun, easy, and budget-friendly way to personalize your ceremony. Always consider your theme, color palette, venue, and other decor when designing your wedding arch. Here are a few more tips for decorating your DIY wedding arch:
How to decorate a wooden arch for a wedding made simple
Whether you're working on the DIY rustic wedding arch of the year or simply attaching a few wedding drapes, there are endless ways to decorate your wooden masterpiece.
A wooden wedding arch is easy to embellish and works well with most themes, depending on the type used. For example, Bamboo sticks create a delicate, lightweight structure, while driftwood works well for a beach or tropical ceremony. Sheets of delicate fabrics, string lights, candles, and curtains of beads or shells all make great accessories to a wooden arch. However, the classic way to decorate a wooden wedding arch will always be flowers and foliage.
How to decorate a wedding arch with artificial flowers, a quick guide
So now you feel confident with your DIY project and wonder how else to decorate a triangular arch for a wedding. As always, we've got tons of ideas, tips and tricks:
- Less is more. Instead of an elaborate arrangement covering half of the arch, you can keep floral accents minimal with either one type of flower or a single color from your wedding palette. If you use fewer flowers, consider focusing them on a few key areas, like the top of the point (a single, powerful bouquet works best here) or Floral garlands wrapped around the sides of the arch. You could also use individual flowers scattered across the top and sides of the structure.
- Selective coverage. You can create a focal point by concentrating blooms into one arch section. This draws visual attention to that one area, which is helpful if you want to emphasize a specific element of the ceremony. For example, placing the floral piece at the couple's eye level will unconsciously cause the wedding guest's eyes to linger at that point.

- Big blooms. At Ling's, we're fans of going full floral, which is why we created this DIY triangle wedding arch tutorial! Notice how we've designed the floral arrangements to sit opposite each other on the arch.
- Floral curtains. Use your triangular arch as a frame to hold romantic strands of flowers, lights, seasonal foliage, etc. You can use flower garlands or singular strands of flowers to create the curtain effect. Tip: Choose only one flower or color from your wedding design for a minimalist look.
Money matters: How much does it cost to make a floral arch?
How inexpensive it is to create a DIY triangle wedding arch at home may come as a surprise to you. Besides our premium artificial flowers, most items can be found at your local hobby shop, grocery store, or online.
Here is a rough breakdown of what you can expect to pay in materials for your DIY triangle wedding arch:
- 4 Designer Flower Boxes in Burnt Orange and Navy Grand ($32.99 each, about $131 total)
- 1 Supporting Flower Boxes in Provence ($19.99 -for one box)
- 2 Boxes of Accent Flowers in Russet Orange and Denim Blue ($27.99 each or about $56 for two)
- 2 Blocks of Floral Foam (a pack of two costs around $10)
- Hot Glue Gun (anywhere from $10-30 for a basic model)
- 2 Pieces of Wood (this will vary greatly depending upon location and exact material used, but expect to spend anywhere from $20-40 if you use standard lumber)
- Hollow Rods, Green (about $14 for 19ft)
- Cable Ties (about $5-10 for a pack of 50-100 ties)
- Crafting Shears or Scissors (a good pair of shears will start around $10)
Expect to spend around $330-$410 for a completely customized wedding arch design. If you're short on time, you can always opt for ready-to-use arrangements.
Attachment styles: How do you attach flowers to an arch?
There are plenty of ways to attach artificial flowers to your wedding arch. We like tying the floral foam to the arch and adding the stems to the foam because it is simple and inexpensive. Another popular method is to secure the stems or branches around the structure with floral tape, which works best for smaller or lightweight arrangements.

Having a moment? Show it off
You know that feeling when you've been inspired by something online or social media and brought it to life with your own two hands? We call that a Ling's moment! Show off your success by tagging @lingsmoments on Instagram.


