


How to DIY Floral Wedding Arch
A wedding arch is the centerpiece for your ceremony. It’s where you and your beloved will exchange vows in front of all your friends and family, crossing over into a new chapter of your lives together. The arch should capture the aesthetic of your ceremony and reflect your unique sense of style. Thanks to our budget-friendly and lifelike flowers,it’s easier than ever to create a DIY wedding arch for your special day that’s completely custom.
Today, you’ll learn how to DIY a floral wedding arch (also see our wedding flowers) using Ling’s moment flowers and greenery. We used a two-piece arch for easy assembly and set-up. It’s ideal for wedding ceremonies, receptions, or other special occasions. Read on to learn everything you need to know or watch our step-by-step video for hands-on instructions.
What you’ll need to create a wedding arch
- 8 Ling’s moment flower box sets
- 10 Ling’s moment greenery branch sets
- 2 arch pillars
- Wire mesh or chicken wire
- Flower muds
- Zip ties
- Pliers
- Your shining smile
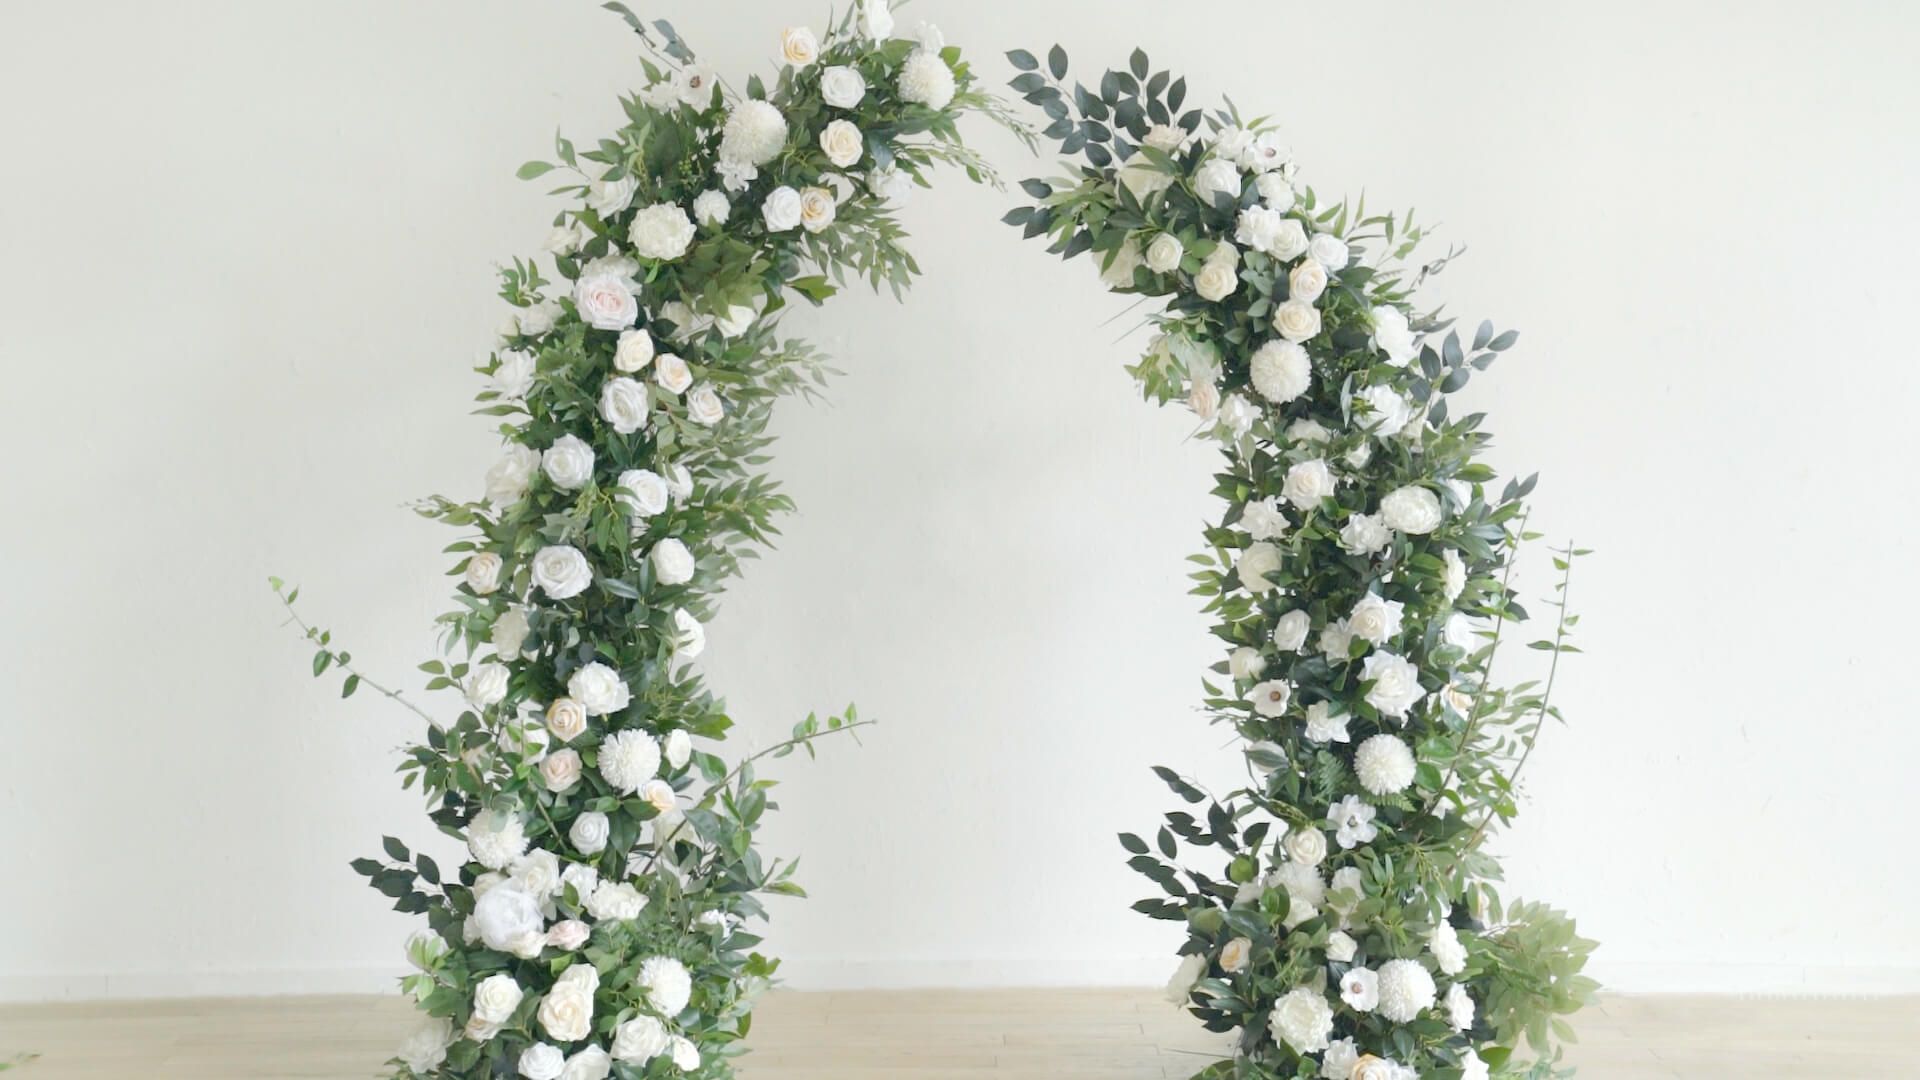
We chose white and ivory flowers to create a classic, pure aesthetic for our wedding arch. But you can use any combination of flower and greenery types you like. We recommend having at least 10 boxes of flowers and 8 boxes of greenery but you can use more to give your arch a fuller look. The arch in the video is approximately 6ft x 6ft and if yours is larger, you might need more flowers and greeneries to creat a floral arrangement.
How to DIY floral wedding arch
Step 1. Make the base with flower muds
First, we’ll make the base for your DIY flower arch. Pile at least 7 pieces of flower mud on the bottom of one side of your arch. Then, wrap the flower mud with wire mesh and secure it with zip ties. Make sure that there are no sharp edges of wire protruding.

Tip: The base of your arch should be thicker than the top. This will give your arch a natural, tapered look and create greater stability.
Step 2. Cover the whole arch pillar with flower muds
Repeat the same process on the other side of your arch. Pile flower mud to create a base, then secure it with wire and zip ties. Keep repeating this process until you’ve covered the whole arch pillar.

Tip: Don’t worry if there are lumps and bumps in your form right now. We’ll cover them with greenery and flowers later.
Step 3. Insert greenery leaves into the flower muds
Now that the main body of your arch is complete, it’s time to start decorating! We’ll start by covering the floral mud with greenery.
Evenly insert your green leaves into the flower mud. Try to insert them at a 30 to 45-degree angle. This will create the illusion that your greenery is growing from the arch’s base. Start from the bottom of your arch and work your way up to the top. To create a sense of depth, make your greenery fuller at the bottom.

We recommend using multiple types of greenery. This can bring depth and variety to your arch. Use your best judgment to create a blended, cohesive look. Once you’ve finished one side of your arch, do the same thing on the other side.

Tip: Don’t insert the largest and longest branches of greenery just yet. We’ll use those as a finishing touch later on.
Step 4. Add more leftover leaves to the base
Use any leftover leaves to conceal exposed floral mud or wire on your DIY wedding arch. Concentrate on the base of the arch, where the greenery should be the fullest. It’s all right if there are still a few visible gaps once you’ve used all your greenery. We’ll use flowers to conceal them later.

Step 5. Insert flowers into the gaps
Once the main body of the arch is covered with greenery, it’s time to add your flowers. Grab your flower box sets and begin inserting flowers into the gaps, one by one. To keep things easy, go one box set at a time. You can either create clusters of the same flower types or spread each flower type evenly throughout the arch. The same goes for flowers of different colors. It’s all up to your unique vision.

Be careful not to make the two sides of your arch too symmetrical. Each side should complement the other, without looking identical. Don’t be afraid to play with different positions for your flowers. You can adjust the stems to face your flowers at different angles.
Step 6. Insert the longest branches near the base
Your arch is almost complete! Once you’ve arranged all the flowers and greenery to your liking, it’s time to add the finishing touches. Insert the longest branches of greenery near the base of your arch, taking care not to make them too symmetrical.

You can also tie ribbons or bows to complete your arch, using colors that match your flowers. It all depends on your unique style and the vision you have for your wedding arch. Your imagination is the only limit!
Step 7. Finish!
Enjoy your beautiful new DIY floral arch! While the arch makes a fantastic backdrop for wedding ceremonies, you can use it as a photo backdrop for your reception, decorate the entrance to your venue, or use it anywhere else that you need a beautiful floral centerpiece.
Since the arch is made with two pieces, it’s easy to transport the two sides and arrange them wherever you like. And since all our lifelike flowers and greenery never wilt, you can repurpose them for home decor pieces, or for birthdays and baby showers after your wedding ceremony!

Don’t want to arrange flowers yourself? Have a look at our arch flower collection. Our arch flowers come pre-arranged in beautiful, timeless styles designed exclusively for your wedding arch. All you have to do is tie them to an arch and prepare to walk down the aisle. It’s an elegant solution for brides short on time.

If you like, you can tag us on Facebook or Instagram to show off your creations. We always love seeing the beautiful pieces that you make with our flowers and greenery. We’re honored to be a part of all your Ling moments!


