How to Make Wedding Sign Decor
If you've been scoping out the details of what you'd need and how you'd go about DIY'ing your wedding welcome sign, this tutorial is for you.
Planning the wedding of your dreams can be both exciting and overwhelming. You likely already have a long shopping list of essential decor pieces for a picture-perfect wedding day. Of all the many (seemingly endless) potential DIY wedding projects, the wedding sign is one of the easiest to execute. That means you can follow our DIY wedding sign tutorial even if you don't describe yourself as 'crafty.'
Grab your glue gun, and let's get going- here's how to DIY your wedding welcome sign.
What you need to make your DIY Wedding Welcome Sign
First, you'll need to gather all the materials for your wedding sign decor. Here's everything you'll need for this craft:
- 1 Designer Flower Box
- 2 Eucalyptus and Willow Leaf Greenery Garlands (6.5ft)
- Floral Wires
- Welcome sign of your choice
- Pliers
- Glue gun with glue sticks
- Your creative spirit
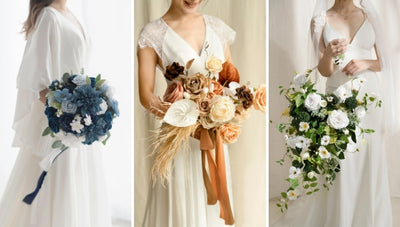
Remember, your wedding is an extension of you and your soon-to-be spouse. This is the time to showcase your unique styles, tastes, and personalities. Rather than settling for generic wedding decor, our designer flower boxes have everything you need to create your custom floral design.
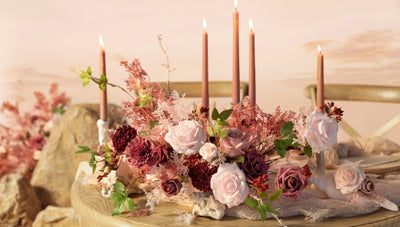
We used one designer flower box in dusty blue and navy to DIY this dramatic wedding sign decor, but you can use any of our designer color palettes to create your own.
How to make a DIY Wedding Welcome Sign
Whether your wedding is free-spirited and modern or full of timeless romance, our 5-step tutorial will help you create gorgeous sign decor to match your theme effortlessly! This DIY wedding welcome decor is a lush, floral, and colorful trim to any signage.
You've got the creative spirit, and we've got the tutorial. Here's how to make a DIY wedding welcome sign in just 5 easy steps.
Step 1. Cut the garland
Let's begin by unraveling the greenery garland and taking out one long cane. Then, cut the garland into shorter pieces. Your goal is two pieces of ¼ and 4 pieces of ⅛).

Step 2. Create a beautiful base
Prepare the base by taking another long cane and attaching the short canes you just made from top to bottom.
You'll use the floral wire to attach the canes. Tie all the cut pieces to the other longer canes. Note that several wires will be at each attachment point for floral arrangements. At this point, your DIY project may look a bit messy- don't worry, we're not finished yet.
 |
 |
Step 3. Adorn with flowers
Now for the fun part- adding the flowers!
Add the flowers to the garland by arranging most of the blooms (about 5-6) to the second attachment point and securing them with a hot glue gun.
 |
 |
Step 4. Add in more flowers
To effortlessly hide the attachment points of the garland, you'll need to accent them with just a few artificial flowers (about 2-3) for a natural, blossoming look.

Step 5. Personalize your wedding sign
Finish the flower garland by personalizing it with as many accessories as you would like from Ling's designer flower box set.
This is another step of the tutorial where you can let your creativity shine and work in your wedding theme. Experiment with your sign, don't be afraid to add more flowers, throw in shells for a tropical wedding, or maybe weave in some twine for a rustic ceremony.
Ling's Moment makes it easy to customize and personalize any wedding decor. You can choose different kinds of artificial flowers and greenery from our designer-created collections, adjust the garland size, or accent it with other accessories, like lights or ribbons.

All done!
Your DIYing is done. Now, you have a beautiful, fully customized welcome sign for your wedding! Keep reading for commonly asked questions and a few more tips and tricks.

DIY Wedding Sign FAQ
Is a wedding sign necessary?
Look, this is your wedding, and very few things are necessary. White dress? Pick whatever color you want. Cake or cake pops or no cake? You choose. Elopement in Las Vegas Britney Spears style or church ceremony with one thousand of your closest friends and family? Up to you.
So when you ask: is a wedding welcome sign necessary? The answer is 'no, but it's pretty neat.'
The wedding sign is simply a way to welcome guests to your big day. A typical welcome sign can include details like the couple's names and wedding date. You can skip the sign altogether or make a gorgeous, fully customized floral masterpiece of a sign, like the one in this tutorial.
Extra tips: how to decorate a wedding sign
Now, you may wonder, "How do you decorate a wedding sign?" Since welcome signs are like a blank canvas, you can elevate the look with your wedding theme.
Here are a few ideas on how to decorate your wedding sign even further:
- Seating chart. Many couples choose to display their seating chart on or near their wedding sign.
- Dinner or cocktail menu. This is a fun and easy way to let guests know their food and drink options for the evening!
- Wedding guest book. Give your friends and family a place to leave warm wishes as they celebrate your big day with you. Placing this book by your welcome sign is a no-brainer.
- Greenery. It's no secret that all of us at Ling's Moment are big fans of greenery! Try stringing extra garland around your wedding sign or the stand/table supporting it.
- Drapes. Use wedding drapes, shawls, silk, or chiffon to add an extra dose of your wedding colors to your welcome sign.
- Balloons. What's a simple, quick, and easy way to add some flair to nearly any wedding decor? Balloons!
How do you put flowers on a wedding sign?
Wondering how to attach flowers to a wedding welcome sign? There are a few easy ways to do this! Here are our top tips:
- Boutonniere pins. An especially strong pin for crafting, you can use these pins to attach lightweight floral swag or flowers to your wedding welcome sign.
- Hot glue. If you're trying to figure out how to attach faux flowers to a wooden sign, you might have just found the easiest option.
- Command hooks. Easily found at most dollar or craft stores, hang ribbons, cloth, or small fabric embellishments on your welcome sign with command hooks.
- Metal pins. Use the metal pins made specifically for hanging small, lightweight art on the walls.
What is the best material for wedding signs?
When it comes to materials for your DIY welcome wedding sign, you've got options. Consider these choices for your signage:
- Wood. Using wood isn't exclusive to rustic weddings (although the two are a great combo!). A wooden wedding sign has many advantages, such as durability and the quality of being recyclable or compostable. We also love that wood invokes feelings of sturdiness and timelessness.
- Foam boards. Not only are they affordable, but they're also easy to find, lightweight, durable, and completely customizable.
- Acrylic. Weather-resistant and lightweight, acrylic (Plexiglass) is a rigid, plastic-like material that is more durable than glass. This tends to be the most expensive welcome wedding sign option. Mirrors. Wedding signs featuring mirrors have gained popularity in the past few years for their vintage, heirloom feel. One thing to consider if you choose a
- mirror: The text can sometimes be hard to read. But you can always add an opaque element to help remedy this, like writing your message on paper.
How can I repurpose my wedding signs?
If you're considering repurposing your wedding sign, you're in good company! Who wouldn't want to re-use an element from one of the most memorable days of your life? Here are some ideas on how to repurpose your welcome (or any) wedding sign:
- Wall art. One of the easiest ways to repurpose your DIY wedding signs as wall decor is to frame them. Add the frame to a gallery wall or as an artistic focal point anywhere in the house.
- Entryway decor. If you avoid using dates on your welcome signs, you can easily repurpose them for your entryway.
- Other events. Repurpose your wedding signs for other events celebrating your love, like Valentine's Day or an anniversary. Many couples use the wedding sign for their 5th wedding anniversary, where the tradition states that the gifts must be 'something wood.'
Give us a sign
Success! You've officially made it to the end of your project, and you're probably feeling pretty crafty right about now. If you found our DIY wedding sign tutorial helpful, show us your creation by tagging us on Instagram or Facebook! Should you have questions, feel free to comment below or connect with us on social media.
If you've decided DIY is not your thing, no problem! Our premade sign decor offers a delicate and beautiful look for weddings, proms, and other special occasions. With expertly curated designer color palettes, our premade decor pairs beautifully with nearly any wedding theme.