How to Decorate a Wedding Arch | Try this DIY Wedding Decor Hack
Let’s set the stage for the heart of your wedding - the ceremony. Your ceremony arch will be a major focal point in your wedding photographs, not to mention the birthplace of your happily ever after. A beautiful wedding arch is a must-have design piece.
This unique wedding arch uses a circular hoop base to create a bold and contemporary backdrop. It’s totally trendy and memorable - not to mention photogenic. The best part? You can easily make it yourself using Ling’s Moment flowers, greenery, and fabric.
What you’ll need for this DIY wedding decor hack
Let’s begin by gathering your materials and supplies. To make this circular hoop arch, you’ll need:
- 6 Designer Flower Boxes - Lilliana Terracotta Grand Box x4 and Dahlia Sunset Terracotta Box x2
- 2 Basic Flower Combos - Brilliant Amber
- 2 Greenery Garland Boxes - 6ft Willow and Eucalyptus Leaf Garlands
- 2 Greenery Branch Boxes - Long Leaf Eucalyptus
- 3 Greenery Combos - Sunset Fall Greenery.
- 1 Arch drape box - Ombre Sheer Drapes
- Pliers
- Wire mesh
- Floral foam
- Cable ties
- Scissors
- Clamps
- A circular wedding arch frame
- Your creative spirit
We chose our sunset terracotta collection to create our arch, but you can easily substitute your favorite wedding color palette - like English pastel or Dark Teal & Burnt Orange. Each of our designer color collections contains a unique selection of flowers and fabrics to help you easily customize your look.
How to decorate a wedding arch - step-by-step
Step 1. Drape the First Fabric Piece
Once you’ve gathered all your supplies, it is time for the fun part - bringing your arch to life. Let’s begin by draping the fabric on your arch frame.
A great tip for decorating a wedding arch is to think of the frame as a clock.
Drape one piece of fabric just to the right of the 12 o’clock position. From there, stretch the inward-facing fabric to the 8 o’ clock position and the outward-facing fabric to the 9 o’clock position.

Fold the fabric so that each piece drapes outward and attach it to the arch with a clamp.
 |
 |
Step 2. Drape the Second Fabric Piece
Take a second piece of fabric and drape it over the 11 o’clock position.

Stretch the inward-facing piece to the 1 o’clock position and the outward-facing piece to the 4 o’clock position. Use clamps to secure the fabric to the arch frame.

Tip: Pull the fabric on one end to create a fuller look.
Step 3. Attach Floral Foam to the Arch
Now let’s add the flower arrangements to your arch. We’ll start by creating a foam base.
Wrap a piece of floral foam with wire mesh, then secure it to the arch frame with cable ties. Trim the excess with scissors.
 |
 |
Repeat this step to create two large floral foam sections on opposite sides of the arch.

Tip: One of our favorite ways to decorate a wedding arch is by using visual contrast to create an interesting and elevated look. You can achieve this by making one of these floral foam sections larger than the other.
Step 4. Add the Greenery
Because we want the flowers to be the focal point of our arch, we’ll first create a greenery base.
Use pliers to cut your vine garlands into smaller sections. Cut the majority of the pieces into 5 or 10-inch lengths. Save one fifteen-inch section to create two smaller cuttings and one slightly larger cutting. We’ll use these to create added depth and dimension.
 |
 |
Now that you’ve prepared your greenery, it’s time to insert it into the floral foam. Concentrate the branches on the sides of the foam, leaving the middle open for flowers. Use the shorter pieces towards the outside and the longer pieces in the center to add depth. Repeat the process on both sides of the arch.
 |
 |
Step 5. Add the Flowers
Here comes the best part - adding the flowers! To decorate a wedding arch, you’ll need a delicate eye with your flower arrangements.
Start by inserting your largest flowers as a focal point and surrounding them with smaller flowers in varying colors. This will create a beautiful flower cluster.
 |
 |
Create multiple flower clusters in each foam section. The individual clusters should combine to form a single cohesive flower group. Try to vary the placement and angles of the flowers to create a natural, flowing look.
Keep going until you’ve filled out most of the arch, but save your smallest flowers for last.

Tip: It’s ok if you have some flowers and greenery left over. We’ll use those to create complementary flower arrangements for your arch later.
Step 6. Add Details
Let’s complete the main body of the arch with some final finishing touches.
Insert more leaf branches and smaller flowers into your foam to accentuate the focal point flowers. Your designer flower boxes come with accent pieces and small flowers that will add visual interest and variety to your arch. It’s a little detail, but it helps make the overall look more cohesive and beautiful.

Finish by tiding the drapes on the floor, gathering them into neat fabric pools.

Step 7. Add Floor Decor
With that, your wedding arch is complete! Now, let’s complete the look by accessorizing the floor beneath the arch. This will create a romantic look that elevates your wedding backdrop beyond the arch alone.
To make these extra floral arrangements, we’ll use the same floral foam, greenery, and flowers that you used on the arch.
Start by taking a piece of floral foam and laying it horizontally - so that the longest side rests on the floor. Insert leaf branches at varying lengths around the foam, leaving space for flowers.
 |
 |
Use the same cluster method to arrange the flowers on the foam. Fill in the gaps with flowers and accents, making as many extra floral arrangements as you want or have materials for.
 |
 |
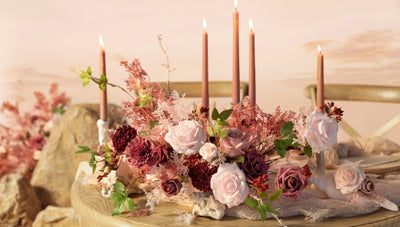
Take your extra floral decor and arrange it beneath the arch, interspacing them with candles and candleholders for
All finished!
And there you have it, a beautiful and trendy wedding arch you created yourself. Your custom wedding arch will add a special and personalized touch to your wedding day.

Feel free to tag us on Instagram to show us your new arch creations. We hope this DIY wedding arch hack will elevate your special moments!
If you don’t have time to make this arch yourself, have a look at our premade wedding arch decor. You can find beautiful floral garlands and fabrics and style your wedding arch without the effort - and you can spend the time you saved on other aspects of wedding planning.
 |
 |